Archive | vegetables RSS feed for this section

Wild Rice & Chicken Casserole

20 Aug

Sometimes when it’s the end of the week and you are left with very few options about dinner, you just have to make a casserole. They are quick, easy and taste good, no matter what you put in them. Whether it be leftovers or just a mishmash of frozen vegetables and rice, they always ALWAYS seem to turn out.

Well, I had one of those days where I had nothing planned for dinner and nothing in my fridge. “Surely…” I thought “there must be something I can make!” I scoured my freezer and pantry and came up with this quick casserole. Lucky for me I had a box of Uncle Ben’s long grain and wild rice and a can of cream of mushroom soup. If you have those two ingredients on hand, you will live to see another day, and your kids will get fed. After you have your basics down, you can change the rest of the recipe how you like. We tend to gravitate towards rice, chicken and broccoli a lot. It’s a pretty common and classic combination. However, this time, there was NO broccoli. (*Side note–I hate frozen broccoli. It is the only vegetable I hate to eat after thawing. It always tastes freezer burnt to me. Am I paranoid or do you guys taste that, too?)
Speaking of frozen vegetables, what a great deal! You get a lot of food for a little price and all those vegetables are typically harvested and frozen within the same day so you know they are fresh. I love having them on hand and throw them into anything and everything when I’m feeling spunky or when I’m in a pinch. Seriously, frozen vegetables are where it’s at.

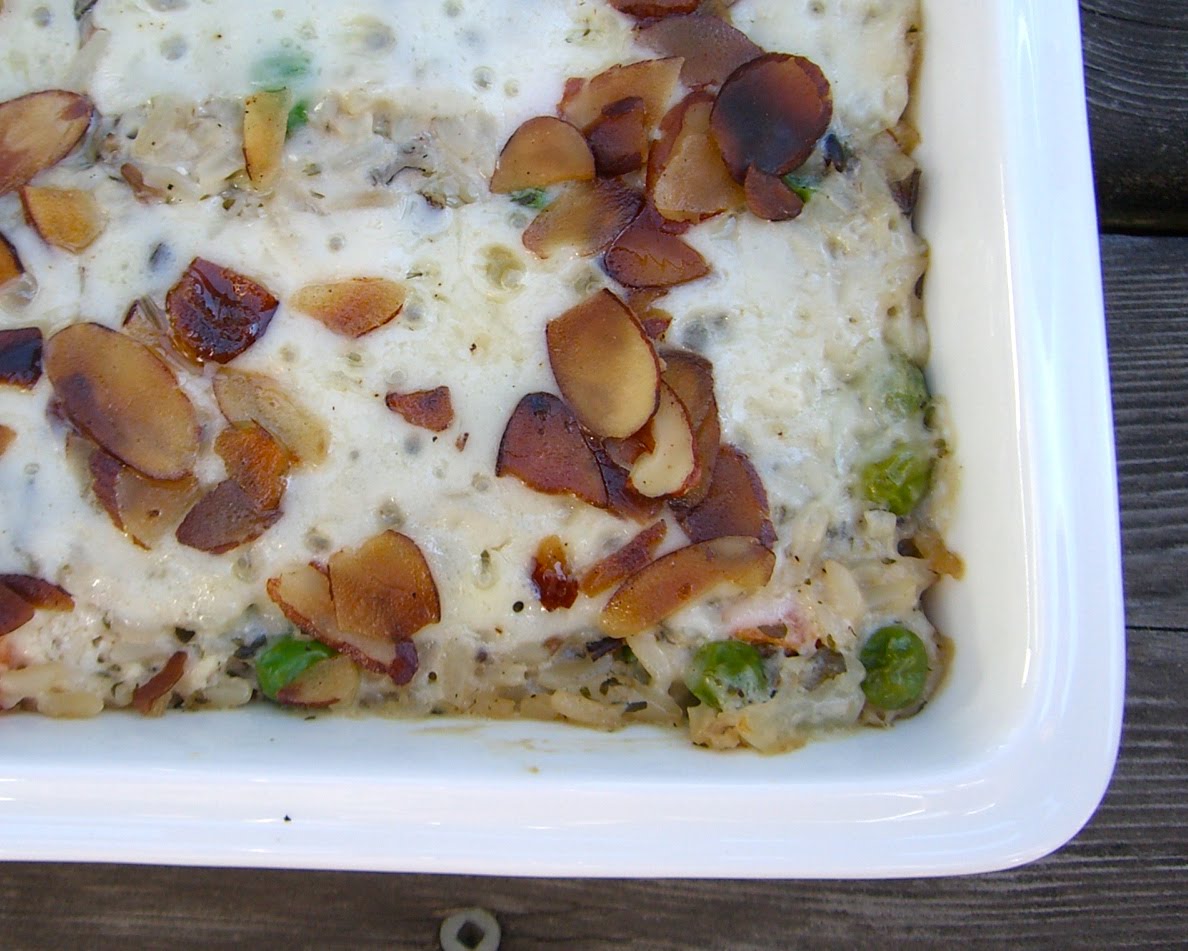
For this particular recipe, I used my handy dandy frozen peas and carrots. They worked so well and tasted great with all the other ingredients even before it all was baked. But, use what you have on hand! I also topped my casserole with some swiss cheese and toasted almonds for a creamy crunchy bite. After the first bite my husband said “Wow….this is good!” in a surprised tone. He was skeptical at first, but the casserole won him over and he ate the rest for lunch the next day! How do you like that, Gordon? Haha!

I love using the random ingredients I’m left with at the end of the week to make great food my family will eat. It saves money and gives me a sense of accomplishment. So, don’t be afraid to experiment these next few days with the food you think you can’t make anything with. You’ll be surprised at what you’ll come up with! Happy Cooking!

Wild Rice & Chicken Casserole
yield: 4 servings

Ingredients:
1 box Uncle Ben’s Long Grain and Wild Rice
1 can cream of mushroom soup
2 cups cooked chicken, cubed (or any other meat)
1 1/2 cups frozen vegetables
1/2 cup cream or milk
1 tablespoon butter
1/2 onion, diced
1/2 stalk celery, diced
salt
pepper
5 slices swiss cheese (from the deli; or use about 1 cup grated cheese, any kind you have)
1/3 cup toasted slivered almonds

Directions:
Cook box of rice according to packaged directions. In skillet, melt butter and sautee onion and celery over medium heat until softened, about 5 minutes. Once cooked, spoon rice into large bowl. To the rice, add cream of mushroom soup, chicken, vegetables, cream, cooked onion and celery, and salt and pepper. Spread into a casserole dish. Top with cheese and almonds. Cover with foil and warm thoroughly at 300 degrees for at least 30 minutes (and up to 60). Serve with a side salad.

Pizza Stuffed Zucchini

18 Aug
(sorry if this photo looks white and grainy! Blogger is being ridiculous and uploading my photos weird!)

Guess what, friends! I have ANOTHER giveaway coming up next week! Stay tuned for that! It’s a good one you’re not going to want to miss!

Well, summer is coming to a close which means I am up to my eyeballs in fresh zucchini. In an attempt to eat a little healthier and lower my carb intake, I created this handy dandy little 20-minute dinner. Seriously! Only 20 minutes from start to finish. And, I used up my extra large garden zucchini. If you don’t have access to any jumbo zucchinis or friend’s with gardens full of them, pick up some small ones from the store. About 1 per person, or in my husband’s case, 2.

To road map this recipe for you, I sliced my huge zucchini down the center and then in half again. I scooped out the seeds so I was left with 4 skinny zucchini boats–perfect for fillings! Before I filled them, I cooked them in a skillet 5 minutes per side, covered; this gives them a little needed flavor and color. I cooked them enough to be crisp-tender–how I like it. (See recipe tips for softer zucchinis) Then I filled them up with loads of pizza toppings and stuck them under the broiler! Thats it! I did happen to have some cherry tomatoes from my garden around too, so I made a little tomato basil mix for the top. So simple, and so good. It’s like the taste of summer in your mouth. I loved these and so did my husband. My daughter just ate all the cheese off the top! 🙂

Hope you all are enjoying these last few days of Summer before we’re into Fall! (PS- I’ve got some GREAT pumpkin recipes that I’m dying to share with you so fall can’t get here fast enough!)

Pizza Stuffed Zucchini
yield: 4 servings

Ingredients:
2 extra large zucchini from the garden or 4-6 small
2 tablespoons olive oil
1 large garlic clove, crushed
salt
pepper
2/3 cup pizza sauce
1/2 cup sliced pepperoni
4 slices deli ham, julienned
1/2 green bell pepper, sliced
1/4 onion, sliced thin
2 cups grated mozzarella cheese
any other pizza toppings you’d like
1/2 teaspoon oregano
1 cup cherry tomatoes, halved
10 fresh basil leaves, torn (if desired)
salt
pepper

Directions:
Preheat skillet over medium heat with olive oil and garlic. Slice ends off of zucchini and slice down the center lengthwise. Scoop all the seeds out so you are left with a skinny boat shape, about 1/3-1/2 inch thick. (*If you are using large zucchinis, slice in half, this time width-wise so you have 4 ‘boats’ per zucchini. If you are using small zucchinis from the store, you can forgo this step) Sprinkle salt and pepper over prepared zucchinis. Remove garlic from pan. Place zucchinis cut side down in pan and cover. Cook 5 minutes and turn. Edges should be brown. Cover and cook another 5 minutes. Transfer cooked zucchini to a sheet pan. Fill with pizza sauce, desired toppings and cheese. Sprinkle with oregano. Bake under the broiler until cheese has browned. Remove from oven. In small bowl, combine tomatoes with basil, salt and pepper. Top cooked pizza stuffed zucchinis with tomato mixture, if desired.

Recipe TIPS
-I like my zucchini crisp-tender. Meaning it is still a little firm but not crunchy like a totally uncooked zucchini would be. If you would like a softer pizza stuffed zucchini, all you need to do is bake the pizza stuffed zucchinis at 375 for 10-15 minutes (as opposed to broiling). This should soften things up!

Mediterranean Chicken & Rice

6 Aug
Here is some interesting information that I need your opinion on: I am thinking of switching URL’s to something easier to remember like “lauren’s lifestyle” or something along those lines. I’m just so indecisive that I can’t decide what to do or when to do it, so tell me what you think of the name, if you like or don’t like it better than golokitchen, etc. etc. It would really help! 
Also, don’t forget to see what I’m up to on twitter (@golokitchen) and make sure you check out the GoLoKitchen facebook fan page!
Now, onto this delicious chicken! I have been meaning to post this recipe for a while now, but I kept forgetting. It wasn’t until today that I found all these photos that I took a few weeks ago for this recipe. So, without further ado, I give you a delicious and healthy dinner that I call simply Mediterranean Chicken & Rice. 
I don’t remember this dish as vividly as other ones because it’s been a while, but my husband certainly does. He scarfed this one down and then took the leftovers to work the next day for lunch. Mediterranean cuisine is very different from our go-to day in and day out meals. We usually go for Southwest and Italian. I wanted a change from the ‘norm’ and this was the ticket! The kalamata olives, sun dried tomatoes and lemon juice were just delicious together and made a great addition to the sauce. I like acidity, so I squirted in lots more lemon juice. The fresh parsley was a nice touch to round out the dish. All in all, a fabulous meal that came together in about 30 minutes. A great summer meal and a great way to switch things up! 
*I didn’t have any artichoke hearts on hand to toss in, but they would be a perfect addition. (I actually meant to pick some up from the store and completely overlooked it, even though it was on my list! How crazy am I?)
Mediterranean Chicken & Rice
yield: 4 servings
Ingredients:
4 tablespoons olive oil, divided
2 large chicken breasts (sliced in half or pounded out and cut in two–you want 4 cutlets)
salt
pepper
1/4 cup all purpose flour

1 small onion, diced
4 cloves garlic, minced
1/2 green bell pepper, chopped
1/3 cup sun dried tomatoes packed in olive oil & herbs, chopped

1/4 cup kalamata olives, halved
1 bay leaf
1/2 teaspoon oregano
lemon juice, to taste
1/2 cup chicken stock or white wine
splash of cream (1/4-1/2 cup)
fresh parsley
more salt and pepper to taste
cooked white rice

Directions:
In large skillet, preheat 2 tablespoons olive oil over medium high heat. Stir salt and pepper into flour. Coat chicken in flour and cook in hot oil until browned but not necessarily cooked. Remove chicken from pan and set aside. Pour in remaining 2 tablespoons olive oil in same pan and reduce heat to medium. Saute onions, garlic, green pepper and sun dried tomatoes until onions have softened, 5 minutes. Stir in olives, bay leaf, oregano, lemon juice and white wine or stock. Place chicken breasts back in to pan. Cover and cook 5-10 minutes. Reduce heat and stir in cream, parsley and more salt and pepper. Serve over warm rice with lemon slices.

Cream of Cauliflower Soup & Buttermilk Biscuits

4 Aug
Guess what everyone! I finally figured out how to link the GoLoKitchen Facebook fan page to my site! I’m really not all that technically savvy. Can you tell? It is located right under my wonderful followers (thanks, guys! 🙂 ) Anyways, check it out and do me a favor: press that pretty little ‘like’ button. It would do my heart good. Thank you.
This soup is a classic recipe-one I remember my Mom making on cold rainy days. Growing up, I always walked to school, so when it was bad weather, I most likely braved the storm and froze all the way home. But, on those awful days, when I walked in the door, I always smelled onions and butter cooking or onions and olive oil cooking. It is one of those memories that I will always remember, one I automatically link to home. I love my Canadian home and all the people that live there. I also love it here too. So, either way I look at it, I can’t win. However, I can do what I can to get the best of both worlds. And if that means making a bunch of my Mom’s recipes, then so be it. 
To be quite honest with you, there is no recipe for this soup–at least one I’ve never seen. And to be frank, I don’t remember everything my Mom put into this. So, I was flying by the seat of my pants come dinner time. Lucky for me that’s when good things and good ideas pop into my head. Now, this didn’t quite taste like the original, but it was still delightful. The flavor was creamy and mild and didn’t really taste a whole lot like cauliflower. My daughter ate it up and so did my husband (a man who is very hesitant around cauliflower). So, for all you cauliflower haters out there, give this soup a chance. And, for you other folk, make this and be excited for October when I share my Grandma’s cauliflower recipe (it’s very simple and involved a lot of cheese). Seriously, you should be excited because cauliflower really can be that good. Just in time for the holidays, you lucky people!
Now, the biscuits were just something I whipped up to have on the side of the soup. Because it’s been a hot summer I hadn’t made biscuits in a very long time, (meaning I was too hot in my un-air-conditioned apartment to even think of turning on the oven) so when I sunk my teeth into a fresh one, it was almost like a reunion of sorts. “WowI have missed you old friend.” 
Note to self: make more biscuits. 

They are pretty little devils that are just delicious and full of carbs. My favorite. Add a little butter and I’m happy as a clam. 
Moral of the story: Soup = good. Biscuits = good. Soup + Biscuits = one happy full family! 
Enjoy!
Cream of Cauliflower Soup
yield: 4 entree portions
Ingredients:
2 tablespoons butter
2 tablespoons olive oil
1 large onion, diced
1/4 cup all purpose flour
5 cups good quality chicken stock
1 large head cauliflower, cut into small florets
1 bay leaf
salt
pepper
1 cup cream or half & half
Directions:
In large pot, heat butter and olive oil over medium heat. Saute onions until soft and translucent, about 5 minutes. Sprinkle flour over onions and stir to create a paste. Cook 2 minutes. Slowly whisk in chicken stock and increase heat to high. Soup should thicken slightly. Stir in cauliflower, salt, pepper and bay leaf. Simmer lightly with lid cracked for 30 minutes or until cauliflower is soft. Reduce heat to low, remove bay leaf, stir in cream and adjust seasonings to your taste. Top with parsley if desired. Serve with biscuits.
Recipe TIPS
-I’ve told you this many times before, but once you add in your cream or half & half, be sure not to boil the soup! Bad things will happen.
-I had to add in quite a bit of salt to my pot of soup to make it taste great, so don’t be afraid to sprinkle in more!
Buttermilk Biscuits
yield: 12 biscuits
*this is my cinnamon buttermilk biscuit recipe minus the cinnamon
Ingredients:
2 cups all purpose flour
2 teaspoons baking powder
1 teaspoon salt
1/3 cup sugar
1/3 cup cold butter, cubed
1 cup cold buttermilk or 3/4 cup whole milk

Directions:
Mix all dry ingredients together in large bowl. Cut in cold butter until its the size of small peas. Stir in buttermilk until batter is all moist. Cut into 12 biscuits or drop onto greased baking sheet. Bake at 400 degrees for 15-20 minutes.

Minestrone Soup

16 Jun
 

Hello, friends! Is it finally summer where you are? We got a glimpse of it over the weekend, but now we’re back to temperatures in the 50’s and 60’s. I think the crazy temperature changes is what is making me feel awful– stuffy nose and a cough. Yuck. So I made some soup to make me feel better. It’s not really the time of year for soup, but sometimes you just have make it.
Minestrone is one of those great soups that is delicious, vegetarian and packed full of nutrition. I personally love the stuff and could eat the entire pot. Its warm, satisfying and one bowl will fill you up! I put dark kidney beans, garbanzo beans and whole wheat pasta for added protein and onions, celery, carrots, tomatoes and cabbage for vitamins and minerals. Overall, its a pretty healthy meal! If you don’t like certain vegetables in here, then you can omit them or substitute them for other ones. For example, if you don’t like cabbage then substitute it for zucchini. Zucchini is a pretty traditional ingredient for Minestrone–I didn’t have any on hand but feel free to add it in. Like lots of other dishes, the longer it cooks the better it tastes. I’d recommend lightly simmering this soup for as long as you can and then 10 minutes before serving, put in the pasta to cook OR just cook it separately and serve it along side. Top the whole dish with some parmesan cheese and crusty bread and thats dinner!

Minestrone Soup
yield: 6 servings

Ingredients:
2 tablespoons olive oil
1 tablespoon butter
1 medium onion, diced
2 large carrots, peeled and diced
2 ribs celery, washed and chopped
4 cups water
2 chicken bouillon cubes (I use Knorr)
1-15 oz. can Dark Kidney Beans, rinsed and drained
1-15 oz. can Garbanzo Beans, rinsed and drained
1-15 oz. can tomato sauce
1-14.5 oz. can diced tomatoes
1 tablespoon basil
1 teaspoon oregano or marjoram
lots of salt and pepper
1/2 tablespoon parsley flakes
1 1/2 cups shredded cabbage
1/4 lb. whole wheat pasta
parmesan cheese
1 loaf crusty good quality bread

Directions:
In large pot, sauté onions, carrots and celery in butter and oil over medium heat for 7-10 minutes. Stir in water, bouillon, beans, tomato sauce, diced tomatoes, spices and cabbage. Bring to boil, then reduce heat and simmer at least 20 minutes. 10 minutes before serving, pour in pasta to cook or boil it separately. Serve with parmesan cheese and good quality crusty bread.

Homemade Ranch Dip

31 May

Move over hidden valley ranch packets! I have got an easy and fresh 100% homemade ranch dip recipe for you guys! Perfect accompaniment for your Memorial Day BBQ’s! And, all the ingredients are extremely common, so you are more likely to whip this up without having to go to the store to get that one last ingredient that you inevitably forgot. I love recipes like this!

Took me about 10 minutes to make this dip and prep all the vegetables for this veggie tray I ended up bringing to a birthday party on Saturday afternoon. I placed it down with the rest of the food buffet style and everyone helped themselves. A few hour into the party, the host came up to me and asked me specifics about the dip. I explained everything I put into it and to her surprise she responsed “its not one of those ranch dip packets?” NOPE!! She then said “fresh ranch is always so much better than store bought stuff” to which I totally agreed! There aren’t any random ingredients that you can’t pronounce in this recipe! All fresh and all 100% natural! My favorite quote from the party was “I could drink that stuff” (referring to my dip!) Needless to say, it was a hit.

I was planning on posting a different recipe today, but since this dip got rave reviews, I decided to post this instead! Hope you guys like it! And, you can add in some buttermilk or plain milk to thin it out and have homemade ranch dressing too! Two in one! Have a great day off!

Homemade Ranch Dip
yield: 1 1/2 cups

Ingredients:
1 cup low fat sour cream
1/2 cup real good quality mayonnaise (I use Real Foods brand-yellow and blue label)
1 tablespoon dried parsley flakes
1/2 tablespoon garlic salt
1 teaspoon fresh ground pepper
1 teaspoon sugar
1/4 cup finely minced onion

Directions:
Mix all ingredients together in bowl. Serve with cold fresh vegetables, or thin out dip with a few splashes of buttermilk to make ranch dressing.

Creamy Chicken and Wild Rice Soup

27 May

Its been raining here a lot and there seems to be NO END in sight. It will occasionally stop from time to time but then it just picks right back up again. I don’t know why I feel the need to make soup when the weather gets bad, but there you have it. Maybe its something my Mom did OR maybe its engrained in my DNA or something! That would be cool. Either way, I made a huge pot of delicious soup and you lucky people get the recipe!

It takes around 1 hour to get all the ingredients prepped and cooked. The hardest part is chopping and waiting. And, to keep the calories low, I used fat free half and half, but who am I to tell you to use the fat free stuff. If you need a little pick me up, then use the good stuff OR the even better stuff: cream! You’ll have to take a few things up with your hiney, but its well worth the confrontation.
Also, this recipe calls for a specific kind of wild rice: Uncle Ben’s Long Grain & Wild Rice Original Flavor (6 oz. box that is skinny and orange) It is very important that you use that kind because it comes with a special spice packet that flavors the soup. Well, I don’t want to force you to buy this, but in my opinion you need it to get the same result that I did. It was only $2 or so. That plus chicken stock, carrots, celery and onions doesn’t end up being all that expensive. Splurging on a little rice never hurt anyone! Plus this particular rice in this soup is amazing! After taking his first bite, my husband said “wow….this is delicious!” So, there you have it folks! Get cooking!
Creamy Chicken & Wild Rice Soup
yield: 6
Ingredients:
2 tablespoons butter
2 tablespoons olive oil
1 cup onion, diced
4 ribs celery, chopped
4 large carrots, peeled and cubed
6 cups good quality chicken broth
3/4 lbs. chicken breasts, cubed
1-6 oz. box Uncle Ben’s Long Grain & Wild Rice
1 1/2 cups half and half (I used fat free)
1/3 cup all purpose flour
plenty of salt and pepper
Directions:
In large pot, heat butter and olive oil. Sautee onions, celery and carrots on medium low heat for 10 minutes to soften. Season vegetables with salt and pepper. Pour in chicken broth and cubed raw chicken. Raise temperature to medium high heat to poach chicken in cooking liquid. Once chicken has cooked and become opaque, pour in rice and seasoning packet that came with the rice. Cover and reduce heat to simmer lightly for 20 minutes, stirring occasionally. In small bowl, whisk cold half and half with flour until smooth. Pour into soup pot and reduce heat completely to low. Cook 10 minutes or until rice is softened completely and soup has thickened slightly. Taste and season accordingly. Serve hot.

Gardening!!

13 May

This is a little bit of a different post today, but it is still food related! I love vegetable gardens! I just planted my garden today and I am so excited to see everything grow! I am all for growing my own (organic) vegetables and it is SO worth it come harvest time! I heard this author on NPR say that for every $1 you put into your garden you will get $10 in return of produce. Plus, any extra vegetables you have, you can cook into something for later, or just jar it and store it in your pantry. Come August, there will be lots of recipes involving yummy produce!
Do you have a garden? Are you all for gardening like me?

Creamed Tomato Bisque

8 Apr

Ok, friends…..I don’t have a lot of time, but I needed to share with you a great recipe that I stole/borrowed from my Mom’s recipe box a few years back. I have no idea where she got it….all I know is that it is easy and GOO-OOD. So, if you are reading my humble blog and you realize that this is in fact your recipe, let me know and I will give you all the credit!

Anyways, I promise you will like this creamy dreamy tomato soup. Typically I don’t like tomato soup because its plain and boring. But THIS stuff……..oh my goodness gracious……this is anything but plain and boring. Its fabulous. I want to bathe in it thats how good it is. Seriously delicious. I’ve made this only a few times because it is pretty sinful and doesn’t get along too well with my online calorie counter, but its well worth it. Eat this with a little grilled cheese sandwich and you’re in heaven. You’re welcome in advance!
Creamed Tomato Bisque
yield: 4 big servings
Ingredients:
1/4 lb. butter
1 cup chopped celery
1 cup chopped onion
1/2 cup chopped carrot
1/3 cup flour
1-28 oz. can diced tomatoes
2 teaspoons sugar
1 teaspoon dried basil
1 teaspoon dried marjoram
4 cups chicken broth
Directions:
In large pot, melt butter over medium low heat. Stir in celery, onion and carrot and sauté until veggies are soft, 10-15 minutes. Sprinkle flour over vegetables and stir until well incorporated. Mix in the rest of the ingredients and cover and simmer 30-45 minutes, stirring occasionally. Puree soup with an immersion blender or a regular blender (but be really careful! Its HOT STUFF!) until smooth. Pour blended soup back into soup pot.
LAST STEP!!–Stir in 2 cups half & half with 1/2 teaspoon curry powder. DO NOT boil once this has been added! Serve hot!
Recipe TIPS:
You could use whole milk, but after the 1/4 lb. of butter, why would you choose the ‘lighter’ option?!

Egg Salad….emphasis on salad

6 Apr

Confused as to what to do with all those darn hard boiled eggs that you all inevitably have from Easter? The obvious choice would be egg salad. The not so obvious would be awesome egg salad….lucky for you I’m here to share my recipe….and its the awesome one.
Back in my younger years when I’d stay up past 10 pm, my brother was usually around. Come 1 or 2 am, he’d get hungry and make himself a snack. Sometimes it was PB&J, other times it would be straight up celery and on occasion it would be a quick trip to McDonalds. BUT, one Friday night, he made egg salad sandwiches. At this point in my life, I hated egg salad because (1) it just seemed like a weird/disgusting concept to me and (2) the whole hard boiled egg smell wasn’t exactly pleasant. Well, have I got news for you. Egg salad is not disgusting!!!–that is when you make it correctly. That evening, my brother explained the science behind his recipe. (Ok, maybe not science)
Here’s the trick–brace yourselves–you need practically equal parts egg to salad (meaning all the crunchy vegetables you add in like celery and onions). Thats it! Life becomes a little brighter when you’re eating an egg salad sandwich (or egg salad with crackers!) that has a little crunch. I like a lot of things on crackers….especially egg salad.
Anyways, the moral of the story is make this and fall in love with egg salad. Its a good one.
PS–This recipe is baby approved!

Egg Salad
yield:4-5 sandwiches
Ingredients:
6 hard boiled eggs, peeled
1/3 cup finely chopped onion
1/2 cup finely chopped dill pickles
2 large stalks celery, finely chopped
1/3 cup mayonnaise (I use Helman’s….NOT low fat)
salt
pepper
Directions:
Chop up hard boiled eggs or use this handy dandy little contraption. Place into large bowl with remaining ingredients. Stir to combine. Fill a sandwich, a pita, a wrap or a tortilla with this stuff…..or do what I do! Use crackers. YUM.
Recipe TIPS:
-Here’s the easy way to cook the perfect hard boiled egg that will be easy to peel! Put all your eggs into a pot and cover completely with water. Cover and bring pot to boil. Once water has boiled, turn burner off and leave the pot alone (whilst still on the hot burner) for 10 minutes. After the 10 minutes, the eggs are done! Now, here’s the important part that makes your life easy or hard when it comes to peeling those shells off. Remove lid and drain hot water while still leaving eggs in the pot. Turn your faucet on and place pot underneath in the sink to shower eggs in cold water. You want to shock your eggs as quickly as possible to shrink the membrane between the egg and the shell. Keep faucet running over top eggs for 2-3 minutes. You may even want to add a little ice to the pot too. Once eggs are cool to handle, crack them open and peel away!